Posts

Showing posts from April, 2008

How To: Bias Binding
Image
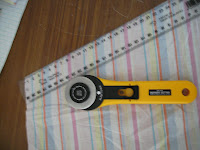
This is on the list of things I wish I'd figured out ages ago. In an effort to remind me to make my own and to share the wealth, here's some basic instructions! Materials: Fabric Rotary cutter or Scissors (if you use scissors, tailor's chalk will be necessary as cutting beside a ruler will drive you mental) Ruler Instructions: ~Find the grain of the fabric (usually running parallel to the selvage edge of your fabric - the sealed side not the one they cut in the shop) ~ Draw a line at 45 degree angle from this. ~ Cut along the line (or just run your rotary cutter alongside the ruler) ~ Cut the desired width - I like using the width of my ruler. Et voila - your own bias binding!

How To: Baby's Bib

Image
Materials: Cute fabric (one meter will make two bibs and bias binding) Terry toweling or hand towel (this can be patterned) Thread in complementary color (I used white in this example) Embroidery thread for decoration (orange used here) Bias binding (or make your own in the same fabric) 1.64 cm Tools: Needle for embroidery Rotary cutter (can use scissors if you prefer) Pencil Scissors Sewing machine Tailor's chalk or washable fabric marker Paper (to make the pattern) Pencil Ruler Pins (pin cushion optional) Stitch unpick (best to have one handy!) Instructions: 1. Assemble your fabric and tools :) 2. Cut 1m and 64 cm of bias binding for surround of bib and neck ties (see instructions on how to make bias binding in next post). The binding I created was 4cm wide. This worked out well as my sewing machine speed is hard to control. 3. Make the pattern by printing this photograph out to size or by using the measurements marked. I used a jar to draw the curves on the pattern and for arou...

Crossed

Image
I finally finished this 'Bang on the Door' Cross stitch. I think I'll turn it into a cushion or a bag, but I've noone in mind for it yet. I also plan on putting backing on it so I can wash it properly without fearing that the threads will come unstuck. It took way too long to do and as a result, looks a bit more grubby than I would like. :(

PJs

Image
A friend of mine made a pair of Amy Butler inspired (inspired because she added an elastic waistband - yeah you!) PJ bottoms out of flannel material. She made a pair in pirate fabric and another in sheep print. She wasn't too keen on her sheep and passed them on to me (I LOVE THEM - so thank you very very much!). She also inspired me to make a pair myself. I had the pattern sitting in my room for months and had different summery fabric ready to cut. But life and laziness and summer days got in the way and I now needed warmer PJs. So enter the brushed flannel cotton fire trucks. :) The pattern is quite flattering in a gigantic way.

Bag Lady no. 2 and a thank you!

Image
I had a girl working with me for a month as an intern and I wanted to make her something to say thank you before she left. So its Bag No. 2. It was lined this time :) A much easier endeavor! Again with the fabric from Spotlight (what can I say I'm addicted!). My intern was with me picking out the one for my friend and liked this so I quickly grabbed a meter and made a bag out of it for her. Close up of the button detail. I love reusing my scraps this way! I also made her a chocolate cake (its going to be my new thing!). A friend of my mother's made this cake for us when we were small and she still makes one for my brother for Christmas as he doesn't like Christmas cake (with him on that one!) and Christmas pudding (what's not to like!). She was kind enough to pass on the receipe and I'm in love! So a joint thank you: to C for the cake receipe and to N for being a great intern!

The Birthday Bag

Image
There's been a lot of bag making and general craftiness going on. Though I'm posting them all as separate posts just to make it seem like I actually have a blog! I got some great fabric in Spotlight. I used the dotty fabric above to make the bag and some cotton flannel to provide some padding for the handles. Ta da! The finished bag! Its not lined and that actually proved to be a bigger hassle than lining the thing. Though I did do some french seams and the next time I'll use a jeans needle to sew through all the fabric - it was too much for my little sewing machine and the normal needle and I had to finish it off by hand! Eeekk - that's what sewing machines are for! And here's the card and bag together for my friend. I also made her a chocolate cake. I even managed to make it while she was in the house talking to one of my housemates as I had an altercation with the mixer before she got to our house (it started smoking, badly and the motor burnt out - goodb...

Gifts last Christmas

Image
Finally getting around to clearing photographs off my camera and realised I hadn't posted some of the bags I made for people for Christmas. Button detail at the top of the bag. Close up of the lining Second tote bag Lining - I didn't like how this one turned out as much as the other pink lining. Both were cotton quilting fabrics that I got on sale at some stage. Close up of the flower. This was cut out of fabric I bought in a scrap bag from one of my local shops. It gave the bag a bit of movement!

Getting ready for 1970

Image
I went to a 70s party a few weeks ago. I scrounged around the second hand shops and found a wonderfully gaudy red dress. It was a bit small (I'm thinking teenie bopper) and I had to add in side sections to get it to fit! No photos of me in the cossie but definitely post it when I track some down!